Another growing form of community comes in the form of virtual worlds. These consist of online groups of people from around the world that not only discuss their specific interests but create and dress up personal avatars (virtual personas) and socialize within computer game environments. Services like Second Life and IMVU.com offer you the ability to be whoever you wish to be, show off, and meet like minded people. These computer generated worlds often offer a subculture of crafters of virtual products sell to their own communities. This has allowed fans to “live the Faire” all year round, and often culminate in real-world gatherings that allow the avatar’s physical counterparts to meet in the flesh. Over time the separations between these two worlds will become increasingly blurred, and it is up to us as designers to be nimble enough to change with the times.
Supporting Environments
On Multiple Devices
It may not seem like it, but we are treading the grounds of a brave new world. A world where our audience is ever more connected with each other. Smart phones and portable tablets are becoming part of the paraphernalia your audience is taking with them to your event. Being careful not to whip out an anachronistic cel phone while in period dress is important, but we need to remain open minded about the ways your customers can experience our events, and take it home with them via their portable technologies. Photos and videos will be taken throughout your Faire, so look for opportunities to make your website mobile friendly, and if you are ambitious, consider creating an App that can include a Map of your Faire, and maybe even a way to get a discount on tickets if they download it. Portable devices are going to be the way we document our world, share our experiences, and make purchases, so thinking about the ways you can use it to promote and enhance the experience of your Faire or craft will have you better prepared for these changes as they continue to evolve..
Sunday, September 16, 2012
Chapter Twelve
A NEW GENERATION of FAIRE
As a card carrying “old timer” it is all too easy to wax nostalgic and find agreement amongst other old timers that the Faires today just aren’t as good as they used to be. To do so is to be blind to a resurgence of the very same energies that created the first Renaissance Faire some 50 years ago. With the Internet making it all that much easier to find kindred spirits from all over the world, groups both large and small are gathering to create their own Faires, and in a variety of different ways. The big Renaissance Faires still exist and are doing well, thank you very much, but smaller, convention sized events are springing up everywhere. Like mini ComicCons these smaller events are stuffing convention centers with Faerie, Steampunk, and Science Fiction enthusiasts.
These are opportunities to meet like minded people, purchase crafts specific to your interest, listen to music created for your demographic and meet the authors and artists that keep your chosen fan community healthy and engaged. While the early Faires had their share of spill over from the Hippie era, today’s events are for all ages and tend to be a sober experience. Faires aren’t going away, they are evolving, and have grown into something different. Still, one thing they all have in common is that very same sense of community, a safe place where you can dress up and live out a fantasy just outside of your work-a-day life.
Ever-Changing Expectations of Your Audience
These new Faires challenge all us designers and promoters to keep on our toes as our audience’s expectations shift more often then before. Today visitors to a themed event come prepared to Play in very specific ways. They know what they want from their experience, and although some merely come to show off, others come to get involved and be “hands on”. Most consistently is that they want to take some of that experience home with them. They are coming to shop and accessorize their persona's, and bring tangible artifacts back to their homes, and they want to meet their idles. Our challenge as the designers of these events, and the crafts people populating them, is to be sensitive to the needs and desires of our audience, meeting those changing expectations with each event.
Chapter Eleven
INDOOR EVENTS
Bringing a Faire Indoors
Everything we have talked about so far has been focused primarily on outdoor events. Richly themed fairs and festivals can be brought indoors as well, and I imagine another entire book could be dedicated to the subject of themed indoor events. To add briefly, many of the rules we have talked about here apply equally well to indoor events. Although the challenges appear different, many are the same. You still need to find a structure large enough to hold your event, with access to a large number of potential visitors. Parking is important, as is fire safety and accessibly by emergency vehicles. Ability to get your vendors in and out of the space, especially when it comes to loading in their booths during set-up and taking them down at the end of the event. All of these are logistic problems, and are likely to be no worse then what you already experience with an outdoor event.
Probably the biggest challenge for your indoor event will be... lighting. When looking for an appropriate indoor venue, you may end up in a large industrial building, warehouse, or in some cases a large livestock or event building located in a fairgrounds. You can be assured that these facilities were not designed for what you plan to do with it, and most are illuminated by light fixtures that are guaranteed destroyers of magic ambiance... fluorescent and zinc lights. To gain the most control over the atmosphere of your event, the best advice is to turn those lights off and replace them with something more theatrical. This adds a lot of expense to the event, and will challenge both the landlord and fire department when you suggest not using the lights designed for the safety of the visitors of your event.
Lights mean rigging and power, and before you jump into doing an indoor event, question your control over how dark you can make the space, and how much light you can bring in to light it in a theatrical way. Ultimately, your goal is to make the space dark enough that the structure of the building disappears, and only the charming shop filled streets are illuminated. Rented generators will be likely additions to your budget, but trust me, your control over the light levels of your event will be worth the extra expense.
FAIRE IN A BALLROOM
Quickly rising in popularity is a new variety of themed event, and these are smaller hybrids of both festivals and conventions like ComicCon. Starting out as a way for niche groups of fans to get together, these are turning into events that encourage their participants and vendors to arrive in costume. All over the country events like Faerieworld, FaerieCon, and DragonCon are taking over the ballrooms and convention spaces of hotels and filling them with crafts and entertainment specific to their target demographic. This allows participants to book rooms in and around the event hotel and producers of the show a lot of existing facilities custom built to suit the needs of their event. In this case, there is much less control over the atmosphere of the event, but for a smaller show, this may just be a necessary evil, as competing with wall to wall carpet and mirrored walls may not be worth the expense and struggle. What these events do deliver is a venue for fans of the larger events to show off costumes that may be too delicate for the outdoors, a chance to visit favorite vendors to help them accessories, and a way to experience night, and late night entertainment, something less possible in outdoor Faires.
It is my expectation that we will see more of these smaller indoor events springing up all over the country. These shows feed a hunger in niche audiences, but their size makes that less of a problem. Smaller events can also act as a way to keep the fan fire burning between larger outdoor events. This allows participants to “live” the fantasy, as they patronize more events throughout the year, and act as a means of income for talented crafts people between the larger events. If you set your goal as creating a full fledged themed event, starting out with a more intimate show could be a good way to introduce yourself to the market possibilities, and your audience to your unique offering.
ADVERTISING, POSTERS & GRAPHICS
Modern Marketing and Advertising have accumulated tools in their trade for promoting events like your Faire. These skills are vital for getting the word out about your event, but the glossy, high production values necessary for promoting something like a vineyard wine tasting, or an art show in the park, may not be completely suited to communicating the atmosphere of your period event. The goal of any advertising, whether in posters, graphics, or fliers, is to communicate what is unique about the world you are trying to create. Too often flashy boiler plate layouts depicting smiling wine tasters and rolling hills of grapes, are replaced with pictures of costume maidens and energetic jousters. What I am saying is, traditional 21st century marketing visual may miss an opportunity to sell your event through more rustic visuals. Potential customers still need to see what they might experience at your Faire, but be sure that the graphic approach also supports the era and overall ambience you are working to achieve. I assure you that attention to this detail will help set your event apart from the others, and make you less willing to settle for a promotion that looks just like every other fair or festival being promoted.
Tuesday, August 21, 2012
Chapter 10
SUPPORTING THE STORY
Faire Map
 As a kid growing up, a trip to Disneyland wasn’t complete without purchasing one of the oversized maps of the park. Although its size made it impractical to actually use as a navigation tool, it was that very same map that I would study with rapt attention all the months and weeks between visits, as I worked to relive my visit through its tiny details. As the promoter of a Faire, having a large illustrated Map is not only an important navigation tool, but a way to better communicate the size, scope, and highlights of your event. In many ways the Internet has replaced that giant paper Disneyland map, but that hasn’t changed the desire to experience its lands vicariously through the digital version. Investing in a fairly elaborate Map of your Faire will help communicate to your vendors the commitment you have to the period, to potential through visitors via your website, and through large print reproductions of it in newspapers and flyers.
Ultimately, your Map will become the best tool to communicate what your event is, what it will look like (in spirit) and what visitors might expect when visiting it.
For vendors and crafts people, creating a simple version of a Faire Map can also help your customers find you within the larger event. Never underestimate the power of a illustrative depiction of your event. The more hand drawn and the more “rustic” its appearance, the better job it will do at communicating what can be expected from a visit to your Faire.
Saturday, August 11, 2012
GAME BOOTHS
Game booths can be the most lucrative of businesses in a Faire, but ironically they are often the most poorly designed. This can happen when a booth is so very large, like an archery game, that themeing such an expanse can become cost prohibitive. Although I sympathize with your pain, I have to say that the ugliest booths often house games. I know there are exceptions, but before you catapult a bean bag at me or fire a dowel at my head, lets discuss opportunities game vendors have that are unique to their business.
Often the biggest challenge for any game vendor is getting visitors to actually participate in their game. This is a problem that midway games have struggled with ever since the invention of the county fair. What is unique about a Renaissance Faire is that your game can actually help transport your audience into the historical time the event is set in. Any opportunity you have of suggesting a little role playing with your game or activity will only encourage participation. Firing a bow is fun, but becoming a knight firing a bow, or wielding a sword, or winning the approving glance of a pretty booth maiden, brings your guests inside the story. If you are tossing coins, why not do it inside the mouth of a dragon (artfully painted on the canvas facade), or hurl bean bag peasants from a rampart overlooking a miniature village? Creating a large game booth can be very expensive, but it can also have the highest return for investment. Whenever possible try to stage your larger games in an environment that doesn’t overlook obvious anachronistic elements (cars, modern buildings), back your booth against a tree lined hillside if possible. If that is not possible, do the best you can to attractively block the view of un-Faire-like vistas, it will help your sales to offer an attractive experience.
Another opportunity is to elevate your barkers above the heads of the passing crowd. Building a short tower, or rigging that allows your booth people to do a better job of drawing attention to your game will succeed in letting them know how fun it will be to play your game, and add interest and energy to your corner of the Faire.
Wednesday, August 8, 2012
GETTING THE ACTION ABOVE THE GUESTS
Once you have broken beyond the 8 foot mark, the next obvious opportunity it to get a few people up there to help draw attention to your booth and wares. Although a structure that allows for the safe weight of a person can be more expensive, having a barker elevated above the heads of guests can add a dynamic quality to your booth that is more likely to draw customers to you. This is true of booth workers and performers sitting in the trunks of trees. Banter from over our head is just not something we often encounter in our modern lives, so take advantage of surprising your audience by making them look up for a change.
Tuesday, August 7, 2012
BREAKING THE 8 ft HEIGHT BARRIER
One of the challenges to designing and building a period booth with materials purchased in the 21st century is the temptation to stick with the standard dimensions offered in the lumber you buy and build with. There is a temptation to make things 8ft tall, to use up all of the materials we are given, but this tends to have the side effect of making the entire world stop at 8 feet. One way to combat this temptation is to push yourself to build both above, and below these dimensions. 6 foot tall structures appear to the modern eye as tiny, and 12 foot buildings giant, purely because we are so used to this 8 foot standard. This will also help the silhouette of your event, making the structures move your eye up and down as you wander the Faire.
Off-Season Storage
Once the Faire has ended for the season, where to store your booth or cart becomes the new problem. More often then not the collapsed parts of a booth are left to lean against the side of a garage with a loosely draped tarp over it, not always protecting it from the elements. Once the Faire is over it can seem like ages until the next one, so the care of your booth might get placed lower on your list of concerns. Fear not, I am a firm believer that Faire booths can improve with age, and if a little moss happens to grow in the corners of your beams, or mold in your thatch, it often just helps make it look the part all the more the following year. There are of course exceptions to this rule, but more often then not, a little age doesn’t hurt the overall effect... and in some cases it actually improves it.
Off-Season Storage
Once the Faire has ended for the season, where to store your booth or cart becomes the new problem. More often then not the collapsed parts of a booth are left to lean against the side of a garage with a loosely draped tarp over it, not always protecting it from the elements. Once the Faire is over it can seem like ages until the next one, so the care of your booth might get placed lower on your list of concerns. Fear not, I am a firm believer that Faire booths can improve with age, and if a little moss happens to grow in the corners of your beams, or mold in your thatch, it often just helps make it look the part all the more the following year. There are of course exceptions to this rule, but more often then not, a little age doesn’t hurt the overall effect... and in some cases it actually improves it.Monday, August 6, 2012
BUILDING A HOOCH (Back Room)
The “Hooch” is the private space behind a booth. This is where anachronistic items are stored, extra merchandise is kept, and sleeping bags wait for overnight camping. These back rooms have an almost mythic quality, as they are tiny, private bubbles in the middle of the glorious chaos that is a Faire. Legends of quiet encounters, the conceiving of babies, and the partaking of various substances are truer then fiction, and many fond Faire memories include “what happened in the Hooch” during and after business hours. Still, a Hooch has a business function that necessitates that its contents are not viewable by the public and valuable items are safe when you are out front working with your customers. Hooch’s are famously easy to get in and out of, so it is advised that you create a simple plywood box that you can padlock for your more valuable items. The extended family that is a Faire are not here to rob you, but you might as well avoid temptation by not leaving valuables out where they might inadvertently disappear.
A Hooch can consist of simple burlap walls, or be as complex as an entire lock-able building. Some Hoochs are under the counter, some can be a penthouse on the roof of your booth. At the Oregon Country Fair, a contemporary of the Renaissance Faire, but with a more tie-died spin, has booths that one could argue are all about the Hooch, with secondary attention paid to the merchandise being sold below. The OCF is a spectacle that you could argue hasn’t truly been experience if you haven’t watched it go by from an elevated private deck perched on top of someone’s booth with a glass of some beverage in your hand. The Hooch is just another perk awarded to those participating in a Faire, made better when you are the owner and not just a visitor.
A Hooch can consist of simple burlap walls, or be as complex as an entire lock-able building. Some Hoochs are under the counter, some can be a penthouse on the roof of your booth. At the Oregon Country Fair, a contemporary of the Renaissance Faire, but with a more tie-died spin, has booths that one could argue are all about the Hooch, with secondary attention paid to the merchandise being sold below. The OCF is a spectacle that you could argue hasn’t truly been experience if you haven’t watched it go by from an elevated private deck perched on top of someone’s booth with a glass of some beverage in your hand. The Hooch is just another perk awarded to those participating in a Faire, made better when you are the owner and not just a visitor.
Sunday, August 5, 2012
CREATIVE MERCHANDISE DISPLAYS
There are practical considerations to make when creating a display for your work. Potters need sturdy shelves, expensive jewelry needs to be in a case, and fine breakables should be out of the easy reach of children. Displays also need to be something that can be easily broken down and carted home after a Faire has ended. All this being true, there is an opportunity to think outside of the conventional crafts fair display when presenting your work at a Renaissance Faire. Using organic elements like twigs and branches can create unconventional but attractive displays. Without wanting to over power your work, think of it like a flower arrangement, where your product represents each bloom. Find ways to tell the story of how your art is made. A metalworker could display a few items on an anvil, or surrounded by blacksmithing tools. A woodworker could cover the floor of his booth with wood shavings, and weaver could display baskets filled with wool in all stages from sheep to yarn. Anything you can do to your environment that speaks to the process taken to create your products will better help your customers relate to what they are looking at and eventually purchasing.
It must be added that the original Renaissance Pleasure Faire was based with the goal to recreate history, and their early booths demonstrated how their wares were crafted. It is worth considering including a work area within your booth that would allow you to work on building more merchandise for your shop. This allows your customers to better understand the workmanship that goes into each piece, creating additional interest and entertainment, and a way to keep you busy during the Faire. One thing you can do that Walmart never can is demonstrate the love and attention that goes into everything you make.
Food merchants have a harder time displaying their products, purely because the health department frowns on the presenting of uncovered food. With this in mind, food vendors have an opportunity to suggest how the food is being made. Although just behind the plywood wall and screen a booth worker may be stirring a stainless steel pot over a gas burners, but this shouldn’t stop the owner from displaying an oversized cast iron pot in a large brick hearth with the menu items painted on its side. Also creating banners and signs that depict period people eating your food, for example Henry the Eights holding a turkey leg, or a court jester juggling meat pasties is a way to suggest to the public that to eat your food is to consume a bit of history itself. The reality of running a food booth is that the experience in the kitchen is very different then that on the street, but that shouldn’t stop you from telling a story, one that takes its audience deeper into the role playing that drew them to the Faire in the first place.
Thursday, August 2, 2012
Chapter Nine
BUILDING A CART
 If you like, you could always consider foregoing a traditional booth and create a cart. This is especially good if you have small items, or your larger booth has smaller products you can also sell in a satellite location. The biggest advantage to a cart is not only the smaller booth fees, but you are mobile and can rationalize moving if your first location isn’t working for you. Carts can pepper a Faire and have the advantage of being out in front of your customers and not tucked in a corner somewhere with little hope of moving. Some carts are even mobile enough to move constantly, always going where the people are.
This is very nice if you wish to park yourself at the exit when the Faire is ending, or near the stage when a big scheduled event is imminent. Carts can come in all sizes and even include places for you to sit within them. The following sketches* will give you some ideas of what a cart might be, and maybe inspire you to dream up something unique to you and your products.
* Work in progress, sketches coming.
Monday, July 16, 2012
FAKE FACADE

Sunday, July 15, 2012
FAUX THATCH

Saturday, July 14, 2012
ASYMMETRY

Asymmetric:
Not identical on both sides of a central line; unsymmetrical; lacking symmetry
All of the examples so far have been very symmetrical, mainly to show various material options. Asymmetry will always make your booth appear unique and stand out. In this example a square booth is made more interesting by extending the roof to create an addition and surrounding it with a railing. This booth also elevates the floor and is especially good if you need to elevate your customer’s feet, for trying on boots for example, or giving them a surface to lay on for a massage.
Friday, July 13, 2012
BUILDING AROUND A LOCK BOX

 For some, extra security is a must. One method is to start with a very sturdy, lock-able structure and clad the exterior with period details. This is also good if you are able to keep this structure on-site when the Faire is not running. The base box is weatherproof; include a watertight roof membrane, pad lock door, and interior locking shutters. In the second image you see this same box with its themeing applied to it. These can remain year round, or be stored inside between Faires. A peak is added to the flat room and boards are placed around the base to hide the concrete supports. The old Northern California site frequently flooded during the winter months, so concrete piling were a must, but your site might not need such details. Also check with regional building codes to make sure you are not violating any rules, or making sure it is understood that your structure is a non-permanent shed. Each area will be different so it pays to double check.
Thursday, July 12, 2012
STURDY BOX CONSTRUCTION

Wednesday, July 11, 2012
LOCK-ABLE BOOTH

Sunday, July 1, 2012
TIMBER FRAME BOOTH

Saturday, June 30, 2012
CANVAS ROOF & HARD WALLS

Friday, June 29, 2012
FABRIC TOURNAMENT BANNERS AS A MOTIF

FABRIC WALLS

Fabric Walls
This booth is constructed like the Twigs & Branches design but includes a patchwork peaked roof and back wall. This design also suggests the use of twigs and brambles as a method for displaying small hanging objects. The counter is sturdy and draped in a simple cloth. The counter could include a “lock box” that would allow you to keep valuables safe when you are away between event days.
Thursday, June 28, 2012
CHAPTER EIGHT
BOOTH BUILDING EXAMPLES
The following are some illustrated example of how materials might be used to create your own Faire booth. These are all based on a 8 foot by 8 foot booth space and are only meant to suggest techniques you could use in designing and building your own unique booth. These are also far from the limits of what is possible, so feel free to play and come up with something that will set you and your wares apart from those around you, and yet fit within the overall theme of the event.

This booth is constructed using only large branches, twigs, and poles. The booth is very open with only fabric for a roof and as a view block on the lower rail. Banners and flags decorate the booth as well as a string of colored rags tied along the front edge. This is the sort of booth a traveling crafts person would build and does not include a back space or place to lock away their products. This is a very portable design, but will require you to rope it together each time you do an event. I have seen crafts people arrive with nothing more then a pickup filled with poles and branches and miraculously erect a fantastic booth from scratch. I have to admit that I am not that brave, but I have seen it done to great effect.
The following are some illustrated example of how materials might be used to create your own Faire booth. These are all based on a 8 foot by 8 foot booth space and are only meant to suggest techniques you could use in designing and building your own unique booth. These are also far from the limits of what is possible, so feel free to play and come up with something that will set you and your wares apart from those around you, and yet fit within the overall theme of the event.

Twigs & Branches
Wednesday, June 27, 2012
THATCH
 Thatch is one of the oldest roofing materials and a favorite when depicting a building from this era. The problem is that a true thatch is costly, cumbersome, and not that portable. Real thatch can be a foot or more in thickness, with a very characteristic appearance. With the exception of ambitious permanent structures, real thatch is impractical, but that doesn’t mean that it can’t be faked as a detail on your more temporary structure. Rather then attempting to recreate the thickness of thatch, it is better to go for something a little more theatrical. There are faux thatch materials on the market that are most often used to create tropical huts, sometimes found in Tiki themed establishments. These materials come treated with fire retardant, but cheaper quality faux thatch can have a plastic appearance. Thatch can also be faked by bundling your own reeds, straw, or other organic materials, or better yet attach them to thin strips of wood that can be layered onto the roof of your booth and easily removed and used again for a future Faire. Handmade thatch will need to be treated with fire retardant, so speak with the local fire department or your Faire organizer before considering this particular building material. Allowing the thatch to droop over the edge of your booth will suggest the curved appearance of real Elizabethan thatch, and help hide just how thin your roof surface actually is. A thatched Faire booth or building will definitely help your structure stand out, as long as it is done well, and with an eye to recreating the illusion of real thatch.
Tuesday, June 26, 2012
FAKE BRICKS

With brick there is also the opportunity to be a little playful. Research some of them many patterns that were used during this era and see what you can come up with. Probably the most convincing use of brick is when it is used on a booth that hides just how thin the faux brick really is. Whenever possible created the illusion of wall thickness to keep the eye from coming to the conclusion that your bricks are impossibly thin, and so unbelievable. Here are just a few examples of what is possible when laying out your brick details.
Monday, June 25, 2012
AGING YOUR BOOTH

One quick method is to mix up a very light wash of brown ink or very watered down paint. The consistency of this mixture should be no more then dirty water and should contain very little pigment. First wet down all the areas you intend to age, then taking a sponge soaked in the dirty liquid, begin to scrub in the wash into the corners of beams, along the base of the booth, and in and around high traffic areas like doors and windows. Think about how mother nature might distress your building, so that roof eves might shield the top of your walls while the base might get the most splash and aging. There is no wrong way to do this, so distress as much as you like, and hold back if it is feeling a little too “ramshackle” for your taste. Mostly, you are trying to remove that brand new look that comes with any recently built structure.
Ferrous Sulfate

Sunday, June 24, 2012
RAG ROLLING

When painting plywood to look like a plaster or mud surface, it is important to hide any details that might suggest that you are actually using plywood. Lower grade plywood often includes knot holes, or long running grooves or grains that are typical in this material. Before painting, be sure to fill these holes and cracks with Spackle or wood putty to hide these obvious elements that could ruin the illusion you are trying to create.
Once you have covered your plywood with a base coat, pour out a little of the base color and add a slightly darker color to it. This darker color should only be a very slight tint, almost indistinguishable from the base color. Avoid making this too great a contrasting value since it will draw attention to itself. Then, taking a cotton rag (avoid using terry cloth or a bath towel, an old cotton sheet works best) and bunch it up into a loose roll. Lightly rolling the rag roll in the slightly darker paint, then gingerly apply it to the base color by rolling the rag along its surface. Try to do this in a loose and “organic” way, avoiding symmetrical lines or stripes. Crossing the path of your rag rolling will also hide any obvious lines that might appear as to continue to mottle the surface texture.
If for some reason your end result is too busy, usually something that happens when too dark a color is applied to the base, feel free to apply another coat of watered down base color over the top. There is no wrong way to do this, but it will take some trial and error to discover a look that you like the best.
Saturday, June 23, 2012
BENDER BOARD

Use Wood Chipboard with Caution
When choosing plywood for your period structure, it is tempting to use a type of plywood known as Wood Chipboard (although it is called my many names). This is plywood that is created using glue and chunks of waste wood chips and is popular in home construction because it is cheaper then conventional plywood panels. The very rough surface sounds like it would be a very convenient way to help simulate your plaster or Daub walls. The problem is that even with several coats of paint it still looks like modern Chip Board, and might contradict the period effect you are trying to create. My advice when using Chipboard is to apply many coats of thick paint to the surface, add dirt to the mixture, and even a little plaster, anything to help hide the telltale Chipboard surface.Friday, June 22, 2012
PLYWOOD TUDOR, or UNDERSTANDING WATTLE & DAUB

I am sure we have all had the experience of seeing a motel or apartment block that has attempted to recreate itself as an “olde world-y” timber building. This is often done in stucco with boards applied to the surface to simulate timber construction. Timber buildings, often called Tudor, are what we think of when we imagine Olde England, a quaint holiday scene, or even Santa’s house, but creating the effect has a few architectural pitfalls that can be avoided if you understand how timber buildings were actually constructed.
The building technique used in creating a timber building is called Wattle & Daub. A completely finished, freestanding, timber structure is made where vertical columns make up the walls and support the roof, while horizontal and diagonal members stabilized the upright timbers. It is good to remember that the timbers are actually doing all the work supporting the structure and making it stable. Only then are the gaps between the timbers filled to keep weather on the outside of the structure. To do this, twigs and branches (Wattle) are woven between the beams, often in a slot carved into the inner face of each beam. These are then packed with a mixture of mud, clay, straw, and dung (Daub) to act as a sort of plaster. The timbers would be visible from both the exterior and the interior. In following eras the interior was often coated to hide the timbers inside, creating a “Half Timbered” look.
Most important to remember is that vertical timbers support horizontal timbers, and diagonal timber brace vertical timbers. All too often, faux timber facades ignore this fact and come up with unconvincing results. The biggest mistake is often to create “V” shaped elements that, although decorative, are not at all structural, and can draw attention to the fact that a structure is faked.
Thursday, June 21, 2012
FABRIC as a CONSTRUCTION MATERIAL
The cheapest building material by far for creating your booth or building is Fabric. Unless you are located in a particularly windy area (you don’t want your booth to become a kite), fabric is relatively inexpensive, is easily transported, and does a fabulous job of defining the walls of a structure, hiding areas of your booth you don’t want people to see or go into, and is great for roofs, awnings, and shade while still allowing light to get into your booth. Many Faires insist that all fabric used in booth construction be certified fireproof before the event opens. This can be accomplished by using pre-fireproofed material, having your fabric fireproofed and certified prior to construction, or some Faires will fireproof your booth for you, for a fee. If you are worried about being around toxic chemicals be sure to research what is being used to fireproof anything in your booth so that you are more educated about what is and is not safe.
No matter what you do to them, bed sheets look like bed sheets
When having to create booth walls, roofs, or awnings of fabric it is tempting to use something cheap and readily available, the obvious choice is to resort to used bed sheets. Although I have seen these used on countless booths, I have to say there is just something about them that cries out “BED SHEETS”! It may be the lightweight material, the color, or perhaps the types of patterns that customarily appear on them, but bed sheets actually defeat the look of a sturdy Faire booth and broadcast a lack of quality that will only cheapen the appearance of your wares.Wednesday, June 20, 2012
TRUST ME, "NO ONE PAINTED ROCKS ON PLYWOOD in the RENAISSANCE"

Tuesday, June 19, 2012
Chapter Seven
BUILDING YOUR BOOTH
CART or BUILDING?
When deciding to build a venue for selling your wares, you need to decide what environment will best present your work. The decision to sell from a booth or a cart may be purely budget driven, as booth spaces are customarily “higher rent” then a cart, but ultimately it comes down to what best serves your product. A jeweler might be able to happily present their work from a tiny Gypsy style wagon, or they may prefer the ability to “set the scene” by creating a larger “living room” environment that draws customers in to explore their glassed displays.In this Chapter we explore the various ways you can display your products, and some of the best practices to help integrate your booth or cart into the larger Story of the Faire. How elaborate your booth, or how committed your are both financially and energy wise to the ultimate “look” of your environment is up to you. Keep in mind that the more your booth or cart supports the larger theme, and the more it stands out from your neighbors, the better your chances of drawing customers, encouraging return visits, and the higher your potential of making a sale.

Crafts & Food That Supports the Period
A lot of effort goes into insuring that crafts people create products that help support the period a Faire is set in, it should be stressed that the food that is sold has an equally important role in supporting the larger Faire experience. As we discussed earlier, certain craft purchases can become a tradition and an integral part of a yearly visit to the Faire. The same is true of the food. Having that annual turkey leg, or the meat pasty that they can only get a the Faire is often reason enough to go each season. Food vendors have the unique opportunity to offer tastes and smells that are not easy to come by during the rest of the year. Although not every customer will have an adventurous pallet, you owe it to them to be able to experience the Faire with their tongue as well as their eyes. Sometimes more common foods can be made period with a slight twist. Why serve cherry pie when you can offer “The Queen’s Cherry Tarts”?Monday, June 18, 2012
ACCESSORIZING YOUR EXPERIENC
Future Faire participants usually started as guests, and many lifetime visitors to the Faire come so they can “dress up” and Play Faire. The usual order of events for a first time visitor is that they purchase some fun, often inexpensive accessory to help them “join in the fun” of Faire. For girls this is often a wearable flower wreath, and for young boys a wooden sword and shield. The next year they may come back with a desire to dress up just a little bit more, maybe add a long skirt or bell sleeved shirt. Shopping the craft booths, they may pick up something else to add to their growing ensemble, and so the process begins.
What Faires do well is promote fantasy, and encourage those that participate in that fantasy. Crafts people that help this process of accessorizing will find unexpected sales, and potentially create a bauble, necklace, or other item that may become a Faire “must have” for all the participants. Often I can tell a fellow Faire participant in the isle of a local grocery store, not for their 21st century clothing, but by a necklace or pin that I know they could have only purchased at the Faire.
What Faires do well is promote fantasy, and encourage those that participate in that fantasy. Crafts people that help this process of accessorizing will find unexpected sales, and potentially create a bauble, necklace, or other item that may become a Faire “must have” for all the participants. Often I can tell a fellow Faire participant in the isle of a local grocery store, not for their 21st century clothing, but by a necklace or pin that I know they could have only purchased at the Faire.
Wearing the Other Vendor’s Crafts
The Faire isn’t just a make believe village, it IS a village of people who depend on each other for the success of the larger event. While the Main streets of most American towns include businesses that are desperate to grab customers away from their neighbor’s establishments, our little family is built on mutual support. One way to support this is by choosing to wear and use the crafts made and sold by other vendors. Sometimes your sale may have come from a Faire visitor seeing your product around the neck of another craftsperson, and you can do the same by proudly displaying the work of others in your booth and on your person. Of course there are limits... potters may be reluctant to display the work of another ceramicist, but that doesn’t mean they can’t wear a beautiful cloak, drink from a pewter goblet, or accessorize with a lovely necklace made by another Faire vendor.Sunday, June 17, 2012
BRINGING PUBLIC SPACES into YOUR BOOTH
One of the hazards of conventional arts fair is the creation of an invisible barrier between the seller and the buyer. This is a wall that causes many to walk right by your booth, maybe only glancing at the objects or services you are offering. This may have little to do with the quality of your work and everything to do with the belief that your space is private or unapproachable. Although a jewelry seller may not want guests wondering around behind their counter, there is not reason not to create spaces that encourage visitor to explore and hang out a bit. The more activity in and around your booth the more curiosity and visitors it will attract. If you are lucky enough to have a tree adjacent to your booth space, spend a little extra money to place a few hay bales around its base that the public might use to rest their feet. Although not specifically related to your booth it helps perforate that invisible barrier and suggest that the Faire is happening inside your booth as well as in the streets and byways. Your products and booth should spill out into the world, no tuck back from it, and coming up with ways to attract the attention of your audience and welcome them in will only help your popularity and eventual sales.
Transporting Your Audience
In the end it is your efforts that will support the overall story the entire Faire is trying to tell. You are just one part of the big picture that will transport your audience into the time period. You may be shy about your talents as an actor, but a kind “Good day malady” or a “Good morrow kind sir” can be the extent of your old English accent, but may be just enough to make your audience feel welcomed into the larger play that is the Faire. Take advantage of cheering when a parade is passing, or boo if a group of Spaniards appears near your booth. Ask customers if they have had the good fortune to see the Queen this day, or if they have tried a meat pasty or sticky bun, it will only help make the story more convincing. Still, if these efforts are just too much work, or just too embarrassing to perform, at least dedicate yourself to not purposefully popping the illusion by whipping out a cell phone or surfing the web on a tablet when in front of the public. Your actions go a long way to supporting or undermining the overall experience and pleasure of your guests and customers.Saturday, June 16, 2012
WHAT STORY ARE YOU TRYING to TELL?
When creating a booth it is often helpful to create a story that supports the wares you are selling, the food you are offering, the games you are presenting, or guild environment you are creating. Are you are poor vendor that builds his booth with twigs and branches, or a rich merchant that offers her wares out of a timber frame shop? Are you are candle maker that allows the public to enter your shop to create their own products, or a blacksmith demonstrating what a craftsman looks like when they work? Any personal story you can communicate with the design of your booth will only help your sales and the experience of your visitors. If you are a nomadic seller of merchandise scavenged from far off places, drape your booth with exotic rugs and textiles that look like they just came off the back of a camel. If you are dying fabric for clothing, include a few half barrels of colored water, or better yet actually dye fabric in your booth! Supporting your products, services, or performance space with elements that support its theme will add even more depth to your audience’s experience and encourage them to look, watch, and buy.
Some of my fondest, and earliest experiences of the Faire was spent shoveling ice into glasses of tea and feeding them through a window to the counter help. As behind the scenes as this job might appear, I have a framed window of the Faire that allowed me to focus my experience on just a few yards of dusty street where I could watch all the faces of guests and participants as they came to the counter. One thing I also loved was seeing some of the better knows performers quietly drop their daylong roles, just long enough to order a drink, connect to the counter person, and then launch themselves back into the crowd. It was these moments that made me feel the most included in this much larger event, and yet I was just an ice shoveling individual sitting at the back of a booth.
This can also be true of participants that create a theatrical Inn-Yard, or Guild Yard. These are themed environments, often with seats, dinning tables, and structures that face out to the crowd. Actors and guild members Play the roles appropriate to the environment, and whether peasants or members of the Queen’s Court, they act as a living tableau. The only danger comes when a group so identifies with their own small universe of players that they forget or even ignore the audience separated by only a few hay bales or length of rope. Any opportunity to pull the audience in, if not physically emotionally, will only make your experience and theirs more enjoyable.
Experiencing the Faire from Behind a Counter
There are many ways to experience a Faire, one of my favorites is from behind the counter of a booth. Whether you are selling jewelry, turkey legs, ale, or souvenir maps, a place behind a counter affords you a unique window on the ebb and flow of people, costumes, and street entertainment. Having a booth means you have a home base from which to venture out from and safely return. You have a one-on-one relationship with many of your patrons, and when the Faire gets crowded, a place safe from the crush of humanity. Although you are technically working, you are also visiting guests, fellow participants, and best of all, playing. There is nothing so nice as to have friends sit with you in your own private living room, watching the spectacle of a Faire parading past.Some of my fondest, and earliest experiences of the Faire was spent shoveling ice into glasses of tea and feeding them through a window to the counter help. As behind the scenes as this job might appear, I have a framed window of the Faire that allowed me to focus my experience on just a few yards of dusty street where I could watch all the faces of guests and participants as they came to the counter. One thing I also loved was seeing some of the better knows performers quietly drop their daylong roles, just long enough to order a drink, connect to the counter person, and then launch themselves back into the crowd. It was these moments that made me feel the most included in this much larger event, and yet I was just an ice shoveling individual sitting at the back of a booth.
This can also be true of participants that create a theatrical Inn-Yard, or Guild Yard. These are themed environments, often with seats, dinning tables, and structures that face out to the crowd. Actors and guild members Play the roles appropriate to the environment, and whether peasants or members of the Queen’s Court, they act as a living tableau. The only danger comes when a group so identifies with their own small universe of players that they forget or even ignore the audience separated by only a few hay bales or length of rope. Any opportunity to pull the audience in, if not physically emotionally, will only make your experience and theirs more enjoyable.
Thursday, June 14, 2012
CHAPTER SIX
BEING a PARTICIPANT
Why should I go through all the trouble?
This is a good question. If you are used to doing conventional crafts fairs, it can be hard to imagine the reason for the additional expense of building a themed booth specifically to sell the same products at a Renaissance Faire. Unlike a contemporary fair, Renaissance Faires are a theatrical experience as well as a craft event. The success or failure of the overall theme of the event is largely due to the collective efforts of its many participants. The entire theme of any specific area can be enhanced or destroyed by the appearance of a single booth.
Many visitors to European cities comment on just how “clean” they look. A lot of this is due to the collective efforts of its inhabitants and an understanding that each is responsible for the appearance and upkeep of their individual homes and businesses. This is not only because it reflects on their property, but also on the overall appearance of the entire community. The same is true of a successful Faire. The experience of your guests is greatly enhanced by the appearance of the Faire and the individual dedication of each booth owner to do the very best job they can.
“Buy a piece of the magic”
Renaissance Faires are unique in that their guests often purchase products as a way to take some of the magic of the Faire home with them. Faire guests shop with an eye to accessories their costumes and their lives with the items the purchase at the event. I have often encountered guests and participants that save up for years for a cape, sword, or costume element that they have had their eye on. They do this because the act of buying something actually enhances their experience of the Faire. It is not a mistake that theme park designers place merchandise shops at the exit of many of their attractions. Having just come off a themed ride makes you want to take some of that experience home with you. At a Renaissance Faire the entire event IS that ride, and purchasing some of that is just a natural extension of that experience. So you see, the more your booth supports the illusion of a Renaissance village, the more sales it may generate, purely because your products help your customers live that illusion when at the event or when they return home.Wednesday, June 13, 2012
SUPPORT BUILDINGS
 As the creator of the Faire, you will find the need to supply many structures who’s purpose is not always relevant to the theme of your event. Offices, a Pass House, security, and bathrooms are just a few of the structures you may find yourself building on top of the large, and more thematically important stages and main gate. When ever possible these buildings can be placed out of the sight of your paying customers, but when that is not possible they will need some themeing to help hide them from the rest of your event. Rented construction trailers are a good place to start and they can be draped in burlap, covered with simple plywood panels depicting murals, or faux period walls. In the case of public toilet, and very specifically portable commodes, it is important to fence them off from sight from within the Faire. Our 21st century willingness to suspend our belief when it comes to using a modern toilet makes it unnecessary to theme each one, but no guests wants to herald the Queen of England as she passes a bank of port-a-potty’s.
SHADE STRUCTURES
Since we are discussing important structures that are the necessary evils of any event, we need to talk about shade. It is hard to find a Faire site or event venue that includes all of the attributes we might want, and although the site might have a good location, great parking, and enough land, often existing shade trees are sacrificed for the other three. Your booth vendors will be constructing enough shade for themselves, and potentially their immediate customers, but most of your customers will be out in the sun if there aren’t enough trees for them to congregate under. I have been to many Faires that are located in flat open fields where customers wearing period appropriate, but weather inappropriate, costumes are roasting in the sun.
If this is the case with your Faire, then you will need to take on the expense of building that shade yourself. The “easiest” solution is to construct shad structures. These can consist of telephone style poles driven into the ground and a large tarp, or more period appropriate dyed burlap can be raised like a circus tent over the audience. This is most important in spaces like theater seating, but in the case of areas where people are likely to congregate, like near food booths, shade structures are a must. Shade can be easily rationalized as not always important, but trust me when I tell you that visitors will choose to not return to an event where they have been overheated and miserable.
Monday, June 11, 2012
ALE STANDS
Often Faire promoters will choose to be one sole provider of beverages for their event. This is a smart move, and whether you chose to offer alcohol or must non-alcoholic drinks, you will become the provider of a much sought after commodity. Locating Ale Stands throughout your event, especially near food vendors, will insure a lucrative income for your event, one that can’t always be achieved with admission prices alone. Ale Stands should be designed with as much counter space as possible to allow for as many customers to be served at a time. Your Ale Stand will be popular, and you don’t want long lines to suggest your guests reconsider their thirst. Ale Stands can also be a centerpiece of festive frivolity, noise, and boisterous revelry. Including a large bell that is rung whenever someone tips is a great way to add ambience, and encourage additional tipping by those waiting to be served.
Saturday, June 9, 2012
INFORMATION BOOTHS

Information Booths are often the responsibility, and opportunity, of the Faire creator and promoter. Apart from giving information and acting as a place to offer souvenirs of the event, Information booths can be as iconic addition to your other themed Faire structures. Often placed at a crossroads or entry area, these buildings are your connection with your audience. What can be learned here can be used to improve and grow your event. As the owner of the Faire, you can also offer merchandise that is unique to your event. Maps, clothing, souvenir books, and branded glassware are obvious choices, but also consider showcasing unique crafts made by some of your vendors, and have them specifically promote your event. This will add class to your Faire, help promote your vendor’s work, and avoid the obvious choice of stenciling your logo on wine glasses undoubtedly made in China. Your event isn’t Walmart, so an opportunity to rise above that lack of quality will only help your Faire and its participants.
Thursday, June 7, 2012
BUILDING an INN-YARD (a Stage for Guilds)
If your Faire has Guilds, there is an opportunity to build themed home bases for Guild members to congregate, store their belongings, and rest between scheduled activities. Many Guilds choose to create an Inn-Yard, or open gathering place that is themed to the Guild’s status in society. Inn-Yards were the yards in front of Inns that acted as a place to gather, and became the fore-runner of our modern theater. In the case of Guild Inn-Yards, these are fenced areas that allow members to socialize in-costume and in-character to add to the depth of the overall Faire experience by becoming another form of entertainment for passing guests. Many Guilds treat their Inn-Yard as a theater space, scheduling large meals, musical performances, and other events that are as much an opportunity to entertain themselves as the guests that walk by their Guild environment.
A word of caution. Guild Inn-Yards can become exclusive and have been known to treat onlookers as “not part of our little party”. This is a mistake, and a missed opportunity. Although physically separate from the passing crowd, it is still a part of the larger “stage” that is the Faire. Whenever possible, offering a place for non-Guild visitors to come enjoy the sheltered ambiance of the space, perhaps stay for a little conversation, and even a game, will greatly enhance the experience for both guests and Guild members. Inn-Yards are a very special part of any rich Faire experience, especially if they are open to sharing their unique environment with everyone.
Each Guild may use their Inn-Yard differently. A military Guild might stage drills for their troops. A musician’s Guild may encourage unscheduled jam sessions of period music, and an upper-class Guild might be a venue for entertaining royalty, which on occasion can include Faire guests. Inn-Yards are also the perfect stage for recreating the making of a period craft, the cooking of food of the time, or a place to stage interactive lectures and lessons for guests of all ages. Though the Faire is large enough to offer many experiences, your Guild could give a guest the very best experience of their day, so build that into the culture of your Inn-Yard and everyone can enjoy your hard work.
Monday, June 4, 2012
BUILDING ICONIC STRUCTURES

A Market Cross is a good example of one such iconic structure. Traditionally built in the center of a small village, the Market Cross defined the market square, and the location for weekly produce and livestock to be sold. Iconic elements like this can help establish the theme of an area, act as a visual landmark that can draw visitors to it, and become an obvious meeting place for guests who have separated from their party. Other iconic structures can include a washing well, Wicker-man sculpture, gazeboes, and barker towers. These elements make great “wienies” but they also act as a great centerpiece for street theater. The washing well is the perfect backdrop for peasant performers to interact, gossip, and fling sopping wet clothing about, splashing passersby.
In the case of vendors, any opportunity you have of building an iconic element into the design of your booth is worth considering. You want your booth to stand out, so why not build into it elements that will help draw attention to it. Having your own fountain, tower, wagon, or even a mini stage will act as attention getters, and help your customers more easily find you again when they return. Iconic structures are also great elements to add to the Faire’s promotional Map. Including these unique visual elements into the Map’s design will also help customers orient themselves while exploring your Faire.
Saturday, June 2, 2012
BUILDING STAGES
Apart from the investment of building your opening gate, Stages will be one of the more expensive structures you will need to build. Although there are a wide variety of types of stages you can build, your Main Stage will need to be monumental enough to allow for a fair bit of pageantry. This is where the Queen (or with some Faire’s King) will be at some point during the day, and it will need to be large enough to accommodate country dance performances and large scale period theater. A Main Stage is the perfect place to get your performers off the ground and into a balcony or elevated platform. Your Main Stage can be a character unto itself, and set the overall tone of those events scheduled on it. Other stages throughout your layout can be as small as a few hay bales and work their way up from there. A good way to think of building a new Stage is to consider it as a once-a-year addition. Each Faire you can invest in building one new Stage, or enhancing or upgrading an existing one. Stages are where the bulk of your more formal entertainment will appear, and your audience will spend a lot of their time scrutinizing them. As a rule it is always better to start with less, until you can afford more. A poor painted plywood backdrop might be less effective then nothing at all. It is prudent to avoid a cheap stage and wait until you have the funds for a proper one.
It is also important to allow for some sort of “backstage”area as part of your Stage construction. Having even a small area to rest between scenes, as well as store props and belongings, will make it easier on your performers and help them “own” the stage they will be using during the run of your Faire. Even a little pampering goes a long way to insuring your talent is happy and doing a great job. Having a stage manager or security person is also important so that props and personal belongings do not disappear.
It is also important to allow for some sort of “backstage”area as part of your Stage construction. Having even a small area to rest between scenes, as well as store props and belongings, will make it easier on your performers and help them “own” the stage they will be using during the run of your Faire. Even a little pampering goes a long way to insuring your talent is happy and doing a great job. Having a stage manager or security person is also important so that props and personal belongings do not disappear.
Friday, June 1, 2012
THRESHOLDS & ARCHWAYS

Thursday, May 31, 2012
ENTRY GATE

When you are making your initial investment in a new Faire I always recommend that a large amount of your budget be spent on making the entrance look its best! Even though your guests will only experience it fleetingly, the quality of your entrance is what will set the tone for the experience within. A poor first impression is very hard to scrub away, but a good one will bolster up expectations and create a lasting impression as your audience exits again at the end of the day.
*Alright, unless you are at the Kansas Renaissance Festival
Wednesday, May 30, 2012
FAIRE BUILDINGS
As the owner, creator, and promoter of your Faire, you are also responsible for creating the framework that you will be populating with the booths of those participants that will constitute the bulk of your event. The success or failure of your Faire will rest on your ability to create the thematic structures that will set the tone, and inspire the quality of the structures and graphics that will make up the rest of your Faire. At a minimum you will be building a front entrance, ticket booths, stages, information booths, and ale stands (if you choose). Every one of these structures will be looked at as examples of the quality you expect from your participants. If you scrimp on the appearance of these buildings then you only have yourself to blame if the rest of your event is shabby or half-heartedly constructed. This means that your structures will need to be ‘period’, well constructed, and display the very best graphics you can afford. Inspiring by example is the rule for all great Faires, and this should be foremost in your thinking as you build your event. The good news is that all other themed structures can come later, with each year adding to your growing store of buildings, graphics, and booths.
In the following pages you will find descriptions of the structures you will be designing and building, and their importance to the overall success of your Faire. Many of these buildings can come over time, but their role and influence are describe in detail.
In the following pages you will find descriptions of the structures you will be designing and building, and their importance to the overall success of your Faire. Many of these buildings can come over time, but their role and influence are describe in detail.
Tuesday, May 29, 2012
PHOTO OPPORTUNITIES
Time was that a photo taken while on vacation ended up in a drawer, but today we live in the world of Facebook and Flickr, and more often then not images taken in the morning are posted all over the internet by that evening. The ability for people to find, share, comment on, and repurpose images taken inside your event has never been better, and let’s face it, people love getting their pictures taking in front of stuff! This means free advertising for you, and if the stuff they are taking pictures of themselves in front of has your event’s logo on it, all the better. Whenever you build any large prop or structure for your Faire, think about how your guests might interact with it. Better yet, think of how they might take a picture of themselves next to, on top of, or inside of it. This is free advertising for you, and added experience for your guests. It doesn’t get better that. So if photos of people sitting in the Queen’s sedan chair (when she is not using it), or single handed killing George’s Dragon show up on the Internet or YouTube, this is great for you and your event.
Monday, May 28, 2012
If Your Design Depends on Someone Else Doing Something to Make it Work, You Have Already Failed

The Main Stage for the Faire site was located in a perfect natural earthen bowl, which made for a wonderful theatrical experience, but the entrance to the area was easy to miss as you walked by. We would periodically hear complaints that guests could not find the stage to see the main Queen’s show, so we knew we needed to build something that would draw attention to the entrance. While at Disney a budget for a project might be 100 million dollars, at the Faire my per-Faire expense account was usually closer to $3000. I was asked to build a barker’s platform, or a small tower that I was promised a paid actor would stand upon all day and call passersby to the stage. This project ate nearly my entire budget and it generated a huge, heavy, but OSA safe platform for an actor to climb and stand upon. The morning of the first day of Faire I wandered past the stage and saw that the tower was completely missing! After hunting around I discovered that the ice delivery truck crew had dragged the tower (no small feat) and tossed it back stage. The tower was in their way, so, they moved it. After much scolding the tower was replaced, and as far as I can remember I never once saw an actor stand upon it and do anything. I did however see that a participant was stationed at the base of it all day to keep drunken guests from climbing it and falling off on their heads. Although built with all the best intentions, the design and purpose failed due to that lack of the actor to make it work as designed.
Sunday, May 27, 2012
RAG ROPE
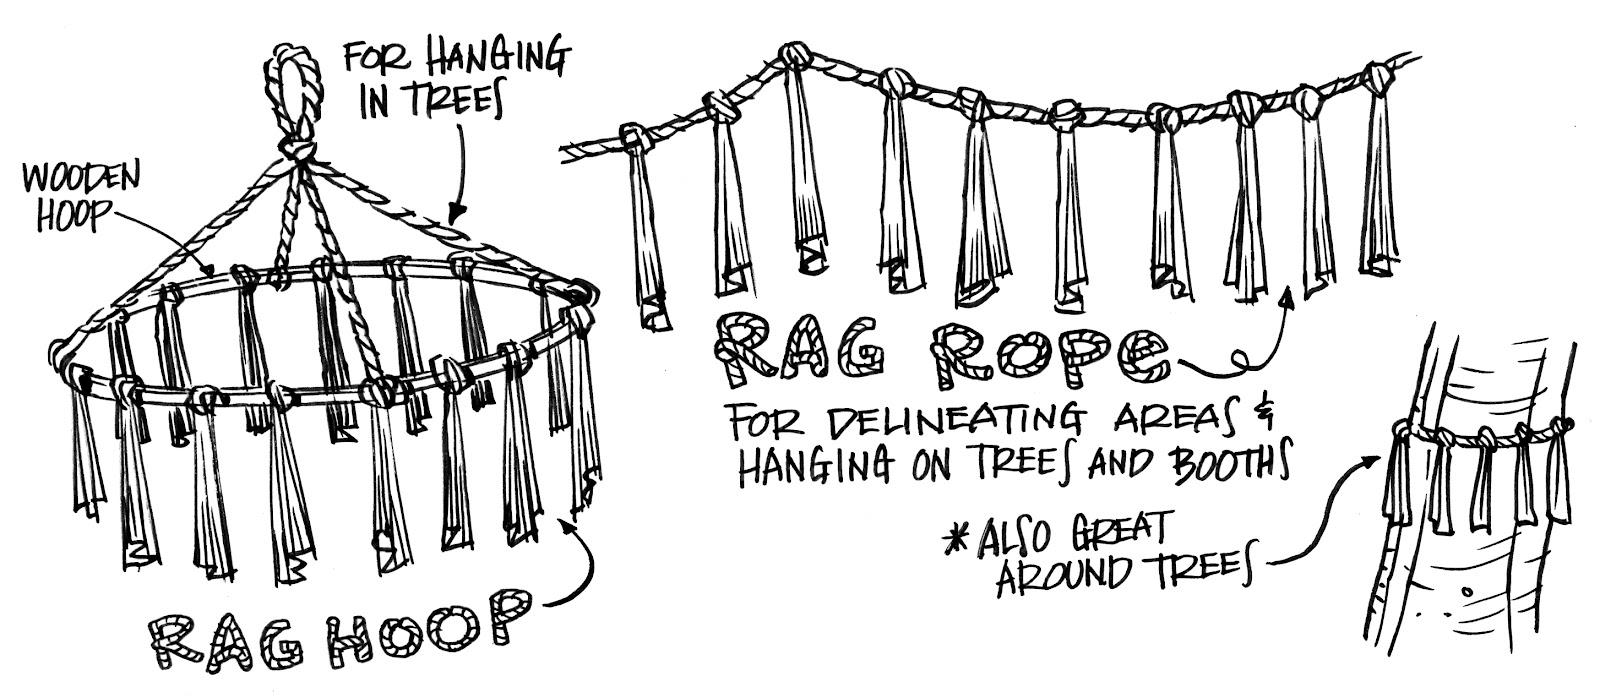
Saturday, May 26, 2012
WAY FINDING & NOMENCLATURE

Friday, May 25, 2012
GRAPHICS & SIGNAGE

Saturday, May 19, 2012
EVERY PROP TELLS a STORY
 Whether building a booth or an entire Faire you will be a wash in props to help fill out your themed environments. As you go through the expense of creating signs, objects, carts, and furniture for various areas of the event, it helps to apply a Story to it. This can be as simple as who owned it, what it was used (is being used for), and how it relates to other people and objects. This may seem alike a trifle and little worthy of the effort, but objects can have a life of their own and giving them a past helps you better judge where they will go in years to come. Just a bench doesn’t have the same weight as it being Fallstaff’s bench. Having just a cart is not as interesting as it being the “slave cart”, “wench cart” or “dung cart”. Names suggest purpose and in the larger improv environment of a large theatrical event like a Faire, being asked to pick up your mother in-law in the “dung cart” has much more potential then just a regular old cart.
WHERE'S the WIENIE?
This is a phrase stolen from Walt Disney himself. The “wienie” refers to any theme park architecture or element that helps draw the attention or interest of the visiting guests to move from one area to another. Like a carrot on a stick to encourage a horse to move forward, the wienie is a way to entice your audience to continue moving through a space. The Disneyland castle is the perfect example of a “wienie”. Guests visiting Main Street USA are compelled to move down the street by the promise of the castle that lays at the end of it. This technique works equally well within the layout of a Renaissance Faire.
A quick example… while working on the Northern California Renaissance Faire site I noticed a large Greenman figure tucked in among the trees near the front of the Faire. The figure stood over 16 feet tall and was all but invisible surrounded by the dense forest. I requested that the Greenman be moved from this location to a more prominent area under a huge oak tree at the end of a main walkway. I was cautioned that the Greenman and his location were sacred and that much ruin would fall upon me if it were to be found moved. I decided he was majestic enough to warrant relocation and promised to take the full brunt of the ill will, if there was to be any. As the Fair opened the Greenman began to evolve as little ribbons and offerings began to appear at his feet, up his arms, and inside his wooden ribcage. Rather then criticism I received countless message of praise for having finally given the Greenman a location worthy of his stature in both the Faire and hearts of it participants. What I had really done was moved a Story rich monument to a place where others could layer their Story upon him. There is nothing I could have done that would have brought more value to have much loved figure, and I created a powerful centerpiece or “wienie” to boot.
Subscribe to:
Posts (Atom)